Staging…

Today we were looking at Staging.

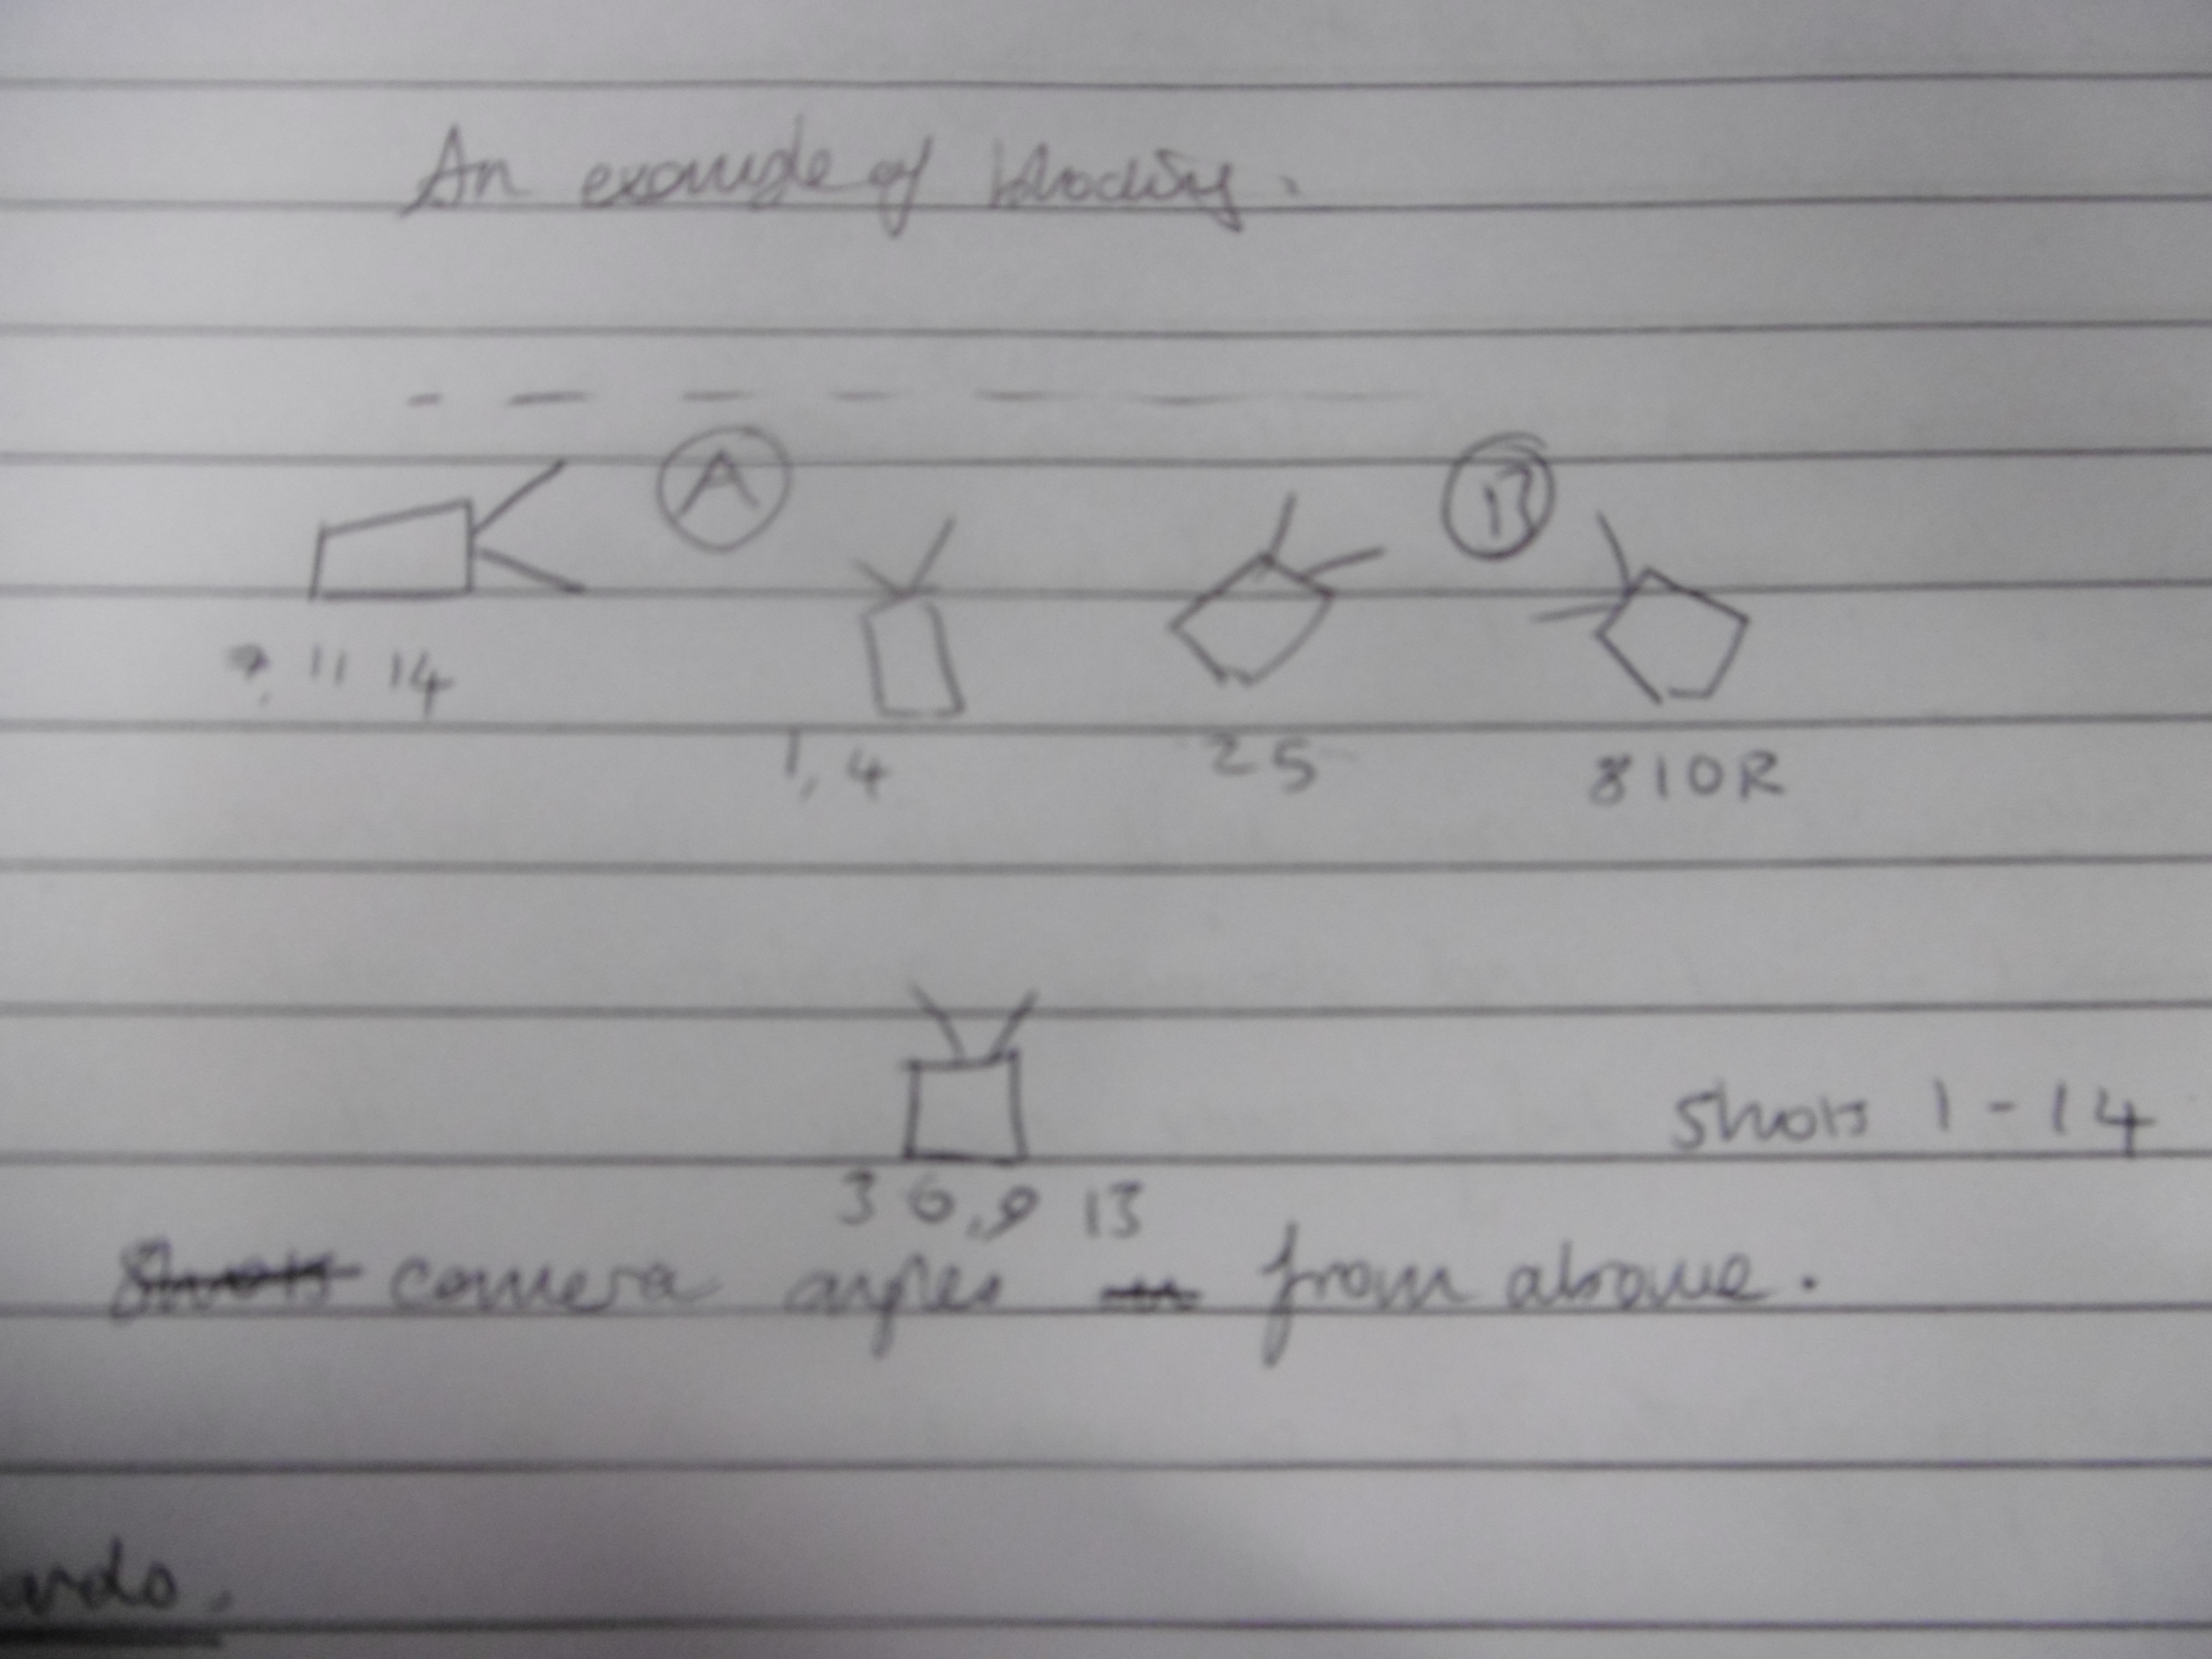
This is the elaborate version of the notes I made during class.

Staging basically refers to how you compose your pictures. How you position things affects what you’re trying to convey to the audience.

Staging applies to storyboards, animatics and the animation itself.

As with we said with storyboards, we have to ask ourselves if the staging is both clear and interesting. Our teacher emphasised how important it was to get the balance right between these two factors.

When creating a shot either for a storyboard, animatic or animation there are some common problems which you can come across.

  • The drawings are too vague.

It’s easier to quickly scribble something which you, the artist, can understand but others can’t.

  • The drawings are over-detailed.

Storyboards and animatics only need to convey the narrative points. We don’t need to see the wood grain on the table or the freckles on someone’s face. Adding too much detail on a storyboard and animatic simply wastes time.

  • The drawings are all in the center of the frame.

Having the figure or action in the center of the shot all the time becomes boring. Our teacher feels that putting things in the middle of the screen tends to create a calming effect – the character is center stage, everything is balanced and all is well in the narrative.

Following on from the last problem, our teacher emphasised how each shot we make has to be carefully thought about. You must be thinking in terms of using the whole screen.

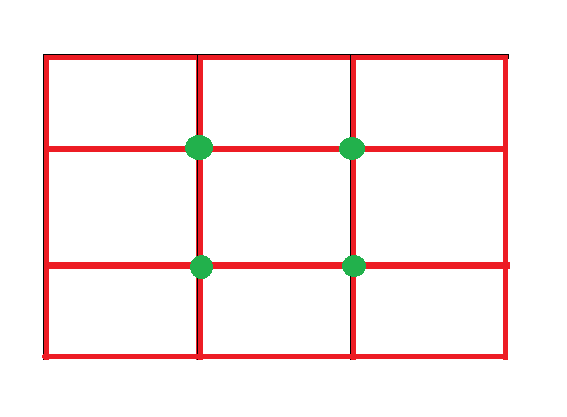
This is where the Rule of Thirds comes in.

The Rule of Thirds is a (primarily photographic) principle where you split your screen/image in to thirds so you have 9 different sections. The points where the lines intersect are hotspots – points of interest. By placing your subject along the lines or on the hotspots, you create a more balanced image. This follows the theory that people naturally look towards the hotspots rather than the actual centre of the image.

Rule of thirds

For good examples of the Rule of Thirds in photography, see: http://takeandtalkpics.com/fundamental-fridays-rule-of-thirds/

When creating a storyboard or animation we must always consider where we want our audience to look. Therefore we mustn’t over-complicate the picture by filling it with too much content. Otherwise the audience will get easily distracted or confused and won’t understand the meaning of the shot. An over-complicated scene will have much more difficulty communicating it’s narrative point.

One picture should make one point and one point alone.

Another rule we looked at was the Golden Ratio

the golden ratio

This is a visualisation of a mathematical formula. Its value = 1.618 approx.

It can be found in nature, Mozart symphonies and some mathematicians believe it can be used to create the most pleasing shapes.

In this case, the point where the spiral shape is smallest…

the golden ratio2

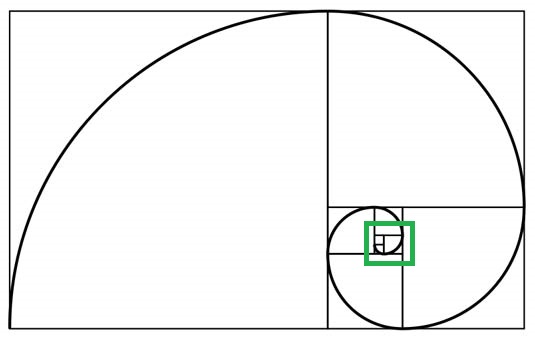
…Is the hotspot – the point of interest. The ratio still applies to portrait work as well as landscape if it’s rotated. It’s a very useful system which can be applied to all sorts of art. (The Renaissance artists liked it!)

Wherever we choose to place our characters or action we still want it to be around one third in to the shot. It’s not a good idea to have action happening in the furthest sections of the screen in the audience’s periforal vision.

Our teacher then went on to highlight how Gag Cartoonists were masters of Staging, for example Charles Adams. For some excellent examples of his work see… http://www.newyorker.com/cartoons/bob-mankoff/charles-addams

Every picture tells a story and this is the case with Charles Adams’s work. Each cartoon provides a snapshot to a scenario. The way the information is presented conveys the message as clearly as possible. I love his “Addams Family” sketches as the humor can sometimes be so subtle, but never fails to make me giggle!

From there, we were given a series of reminders to consider for future and current projects.

We must remember to think about foreground, middle ground and background and pick which one of these we want our action to occur in.

When drawing we must consider the marks we make. The marks are what make drawings interesting – lighter lines are good for backgrounds while thicker, stronger lines emphasise the details of the foreground.

Staging can become more complicated when you have more than one character. You must think about who the dominant character is.

Crucially a different placement says different messages.

That’s all for today! Tune in next week for more!


Storyboards and Animatics – a closer look…

Today’s seminar saw us looking a little closer at storyboards and various examples of animatics. This should help us gain a deeper understanding what makes a good animatic, allowing us to better communicate narrative points. This will all be applied to our animation principles work, where our production teams will have to create these very things in the pre-production stages of our Animation Project.

This is a more elaborate version of the notes I collected from the session.

Storyboards set the direction of the film. Our teacher argued that storyboard artists are just as much the directors of the film as the actual directors are. They’re really important as they give an overall idea of the film.

Animatics are far more time based. They give much more of an idea of how the narrative and action will flow, they can be a great tool for calculating how much work will need to go in to each shot, how long these need to be and provide an early editorial opportunity. Something that looks good on a storyboard may not be half as effective when translated in to a more filmic medium. Crucially therefore, animatics are time savers – they save a lot of work further along.

Our teacher emphasised that it was important not to see the animatic as set in stone. It’s very fluid and can be moulded throughout the production process if need be. It allows you to make a lot of your mistakes a lot earlier on.

We then looked at an excellent example of an animatic from the Disney/Pixar film The Incredibles

They had employed both 2D and 3D resources in to this scene with some backgrounds being 3D, allowing the virtual camera to smoothly travel through them.

The characters themselves were most likely digital 2D.

There was a lot of contextual detail in that there was a lot of narrative information being conveyed, but there was little animation detail. There was no lip-synch, the backgrounds were simple and they only changed the poses and expressions of the characters when they had to.

We had to consider the importance of staging –

When composing a shot it’s wise not to have everything in the centre of the frame.

We need to consider the 3 planes we’re working on:

Background

Middleground

Foreground

When creating a storyboard, it’s tempting to create it starting at the beginning and slogging your way through. However it’s better to be flexible, you can create a rough script then work on one part, then another and then see how these scenes would fit together.

With animatics, it’s crucial not to think of them as a film storyboard. Think of it in layers, with characters, backgrounds and props etc. These can then all be moved around accordingly. Shape it and remould it until something works.

It was interesting to compare the previous example of an animatic (from The Incredibles) with the next example from the Television series, Futurama.

Given it’s television format, the animatic had to be “nailed down” as it was going to be shipped off to another country to be animated.

The narrative is very clear but the production is very different – the artists have filled in sounds with whatever would suit at the time and have had people stand in for actors. This goes to show how an animatic is a fluid, ever changing thing. The narrative is the most important thing you’re trying to convey. The sounds help with timing, and give an idea about what the scene will look like.

Storyboards have to balance two criteria to be effective:

They must be clear

They must have visual intensity.

Every drawing you’re doing has to tell the story. The stories have to be nice and clear, you have to communicate what you’re trying to say – the Narrative Points. Ask yourself, what am i trying to say in this scene?

Don’t over-detail scenes because there’s no need to at this stage. Over-elaborate illustrations aren’t often effective in communicating the basis of your idea and waste valuable time.

That point more or less concluded our seminar!

Tune in next week for more production lectures!


Storyboards and Animatics!

Today’s class saw us looking at the importance of Animatics and Storyboards.

As is before, here is a slightly neater version of the notes I got from our class.

The main points that lead up to a Storyboard and Animatic being made in the pre-production process are:

  • Initial Concept – Whatever your idea may be.
  • Synopsis – a few lines describing the idea.
  • Story development – expanding on the synopsis, asking questions about it like where? when? who? And most importantly why? This is important because we’re not only looking at the surface meanings but also the deeper messages and meanings in the film. As we discussed last week, on the surface “Toy Story” is about toys coming to life. However at its heart, the story considers the fear of rejection.
  • Camera Script – Setting up shots, considering staging and how many shots you’ll need.
  • Blocking – roughly working out where characters are, thinking about how the audience will see things, lighting and so on.

Expanding on these points, the Initial concept is simply the idea. It’s the “seed” of the story. We’re advised to start with a “seed” idea and work the story up from there, layering new ideas on top of it. Rather than trying to come up with a whole fully formed idea in one go. A Synopsis will then summarise the “bones” of the story. It is not a huge long detailed narrative.

Once you have a synopsis you should have an idea of the narratives general direction. This is when you develop the story. You can work out a beginning and ending. We’re told you wouldn’t be expected to have a completed script, you should have a work in progress.

One good tip we picked up was because animation is such a visual medium – Don’t tell something that can be shown visually. Therefore when it comes to dialogue, be “delicate” (as our tutor put it). Voiceovers can be tedious if they’re just describing to us what’s on screen. However they can also be effective, for example if what the narration is saying contrasts with the visuals, it can be very funny.

Camera Scripting is where the director decides things like cutting from shot to shot and framing. Blocking is where the angles for each shot can be choreographed.

P1000200this is a small diagram of an example of blocking.

From there you should have enough produced to create a storyboard.

“By working through the process of story and script in a detailed and methodical way you will leave yourself clear to produce a comprehensive storyboard with potentially the need for few changes.”

(Quoted from one of the slides in the PowerPoint today. I think it was made by Andy Joule, although our lesson was taught by Ron McCrae)*

One of the most important rules about Storyboards is that you need to put in enough shots. For a 4.5 minute section of animation our teacher told us how there were roughly 250 frames in the storyboards. That’s roughly 1 frame per second. It all depends on what the actions is.

Animatics.

After storyboards you can move on to animatic. Animatics are a key part of pre-production. Our teacher emphasised the importance that Animatics are NOT film storyboards, they should be an advance from storyboards. “You should regard it [the animatic] as a film”.*

They save time and therefore money in a real world situation.

They help make a clearer production schedule because you know how much work needs to be done on each shot.

An animatic defines the film structure and we can get an idea of how the film will flow and make changes if need be. It also helps you clarify the narrative.

It is also the first instance where you can properly apply Sound.

Sound is hugely important and should be considered as a major part of the pre-production process from day one.

Sound and dialogue will help you to create a better timed and observed animation and can lead to you being more creative with the animation.

“An Animatic without sound is unforgivable” (Ron McCrae)

When an animatic is completed, it should be continued to be worked on.

Each time a shot is animated, you can drop it over that shot in the animatic.

This will help you:

  • See how much you’ve completed and what’s left to do.
  • See whether your film makes sense now that it’s animated.
  • It helps you spot continuity errors.

Later today our production team, Fluxis, will be meeting to discuss our work – this lesson has been really useful for understanding the sort of work we’ll have to do in pre-production. We’re in the process of creating designs and storyboards so this is fantastic!

That’s all for now folks – see you next time!

Production! Showers and Cowboys.

Today we had a lecture about Narrative,  focusing on traditional narrative techniques. This is all part of our new subject, Production.

This is a summary of my notes from these lectures in preparation for an essay we’ll have to write later…!

Basically, the underlying structure of all stories is the same or similar.

The three core components of a story’s structure being:

  • Exposition – the beginning, where characters, locations and goals/aims are exposed. Exposition sets the scene, it is not the story itself.
  • The Narrative Arc – the main body of the story where there are problems which must be overcome in order to achieve goals, where the protagonist will experience things which will change them as a person, the events which lead up to a confrontation. For example, it can involve a journey, a set of tasks, or simply a set of events or meetings.
  • Resolution – the ending. The result of the journey, battle, learning experiences etc. It can be similar to the exposition, acting as a comparison to the exposition, but often shorter. Of course, some stories don’t resolve themselves – they can end on cliff hangers or twists. Narrative Arcs can also include false resolutions which can deliberately mislead the audience, leading them down perhaps a conventional path, then suddenly subverting it and rocketing the story off in a different direction.

We focused on Exposition using two film examples;

“Psycho” (1960. Dir. Alfred Hitchcock) and “Toy Story” (1996. dir. John Lasseter)

A story’s exposition basically had to answer these questions,

  • Where are we?
  • When is this set?
  • Who are these characters?
  • Why should we care?

Psycho begins in Phoenix, Arizona, on Friday the 11th of December at 2:43pm. We learn this through title cards as the camera pans around a wide shot of Phoenix. There is no year stated, meaning the action is just set in “modern day”. It makes ti easier for the audience to relate to and it’s more expensive to film a live-action movie in the past rather than modern times because of costumes, sets and continuity.

It then zooms in through a half open window in a building and we see two characters, a man and woman in bed with each other.

In the scene that follows we learn important things about them through their dialogue. These facts layout the main goals and problems in the film.

The woman is Marion Crane and she’s a secretary, the man is her lover Sam Loomis. A divorcee with money troubles. Marion wants to marry Sam and is tired of their meetings in shabby hotels. However, neither can afford to live together happily.

We soon work out Marion is the protagonist as we follow events from her perspective. The camera only uses her point of view in this part of the film. We only see one other character‘s point of view – Norman Bates, Marion’s murderer. As he’s the antagonist he’s equally important.

Her main goal: Marry Sam.

Her main problem: Money.

Why should we care? Marion is a sympathetic character, she’s in love but her circumstances are preventing her happiness.

What leads the narrative on after this exposition is something called “The Inciting Moment”

The catalyst that pushes the narrative forward in to the Narrative Arc. This can be a sudden discovery, a mysterious person imparting information, a sudden tragedy, something amazing like winning the lottery.

In this case, it’s where Marion decides to run away with the money she’s been entrusted with to take to a bank.

We see a new scene in her bedroom, the camera is focused on the envelope of money and pulls back to reveal that this is clearly not the bank, revealing a suitcase full of Marion’s clothes. We suddenly know exactly what Marion is planning.

It’s important to note the clever use of her perspective. We see what she sees when she looks at her papers and the envelope of money. Her constant glances at the money shows her moral ambiguity. She’s not a morally bad person and is torn between what to do.

However she eventually decides to run away as she planned. Putting the money in to her handbag. This shot us unnecessary because you wouldn’t put $40,000 in a handbag, but the audience needs to see this as it defines her decision and makes it clear.

The other example was Toy Story.

The exposition sequence shows us that the setting is in a normal American suburb, in a family home. It’s rather vague. We can assume the action takes place in a modern day setting. Because there is no dictated year, the action isn’t dated.

We work out Woody is the main character, when Andy is playing with him we see things as Woody sees them, not as Andy does.

One main difference between Toy Story and Psycho’s narratives is that Marion has a goal to marry someone. Woody already has everything he wants, he’s gone as high as he can –  he has status as Andy’s favourite toy. He also has a presiding role over the other toys, reassuring them and acting as their leader. The story’s exposition and resolution occurs when the toys are most anxious; Andy’s birthday and Christmas. They biggest fear is being replaced and this is the same for Woody. Exposing his anxiety also exposes his goal. We discover Woody’s motivation through his downfall. He’s demoted from his position as Andy’s favourite toy by Buzz Lightyear and has to regain both Andy’s affection and the trust and friendship of his fellow toy while facing his fear of rejection.

We also get to see things from Buzz Lightyear’s perspective as he is Woody’s equal in status. Similar to Woody, Buzz has to overcome obstacles in order to reach some sort of resolution. Buzz has to find a reason for his existence as he breaks through his ignorance. He has to understand that he is a toy and not a real space ranger and accept it.

I never knew there was so much to Toy Story, I’ve always watched it for pleasure, rather than academic purposes but it’s interesting to see the story’s mechanics through a more thorough viewing!